How To Add Swap Space on Ubuntu 20.04
In simple words swap memory is the memory which is used when physical memory (RAM) runs out.When a Linux system runs out of physical memory (RAM), inactive pages and stuff is moved from the Physical memory (RAM) to the swap space.
Swap space can take the shape of either a dedicated swap partition or a swap file which can be attached to a running system. Typically, when running Ubuntu on a virtual machine, a swap partition is not present, and the only possible way to have one is to create one.
Before we start
- We cant just create 32 Gigs of swap and expect it to behave like Ram
- Swap memory is part of the Hard Disk/SSD.
- It has a slower access time than physical memory. If your system constantly runs out of memory, you should add more RAM.
- Systems with less than 2 GB RAM - 2 times the amount of RAM.
- Systems with 2 to 8 GB RAM - the same size as the amount of RAM.
- Systems with more than 8 GB RAM - at least 4 GB of Swap.
- Sudo privileges or Root access is needed to add swap memory.
Creating a Swap File
- In this demo we will be creating 2GB of swap and attaching it to the system, To change size to any custom amount just change 2G with the size you need.
sudo fallocate -l 1G /swapfile- Verify the swap file was created sucessfully
ls -lh /swapfile- Set the correct permissions for the swap file to 600 because we do not want normal users reading and writing to it
sudo chmod 600 /swapfile- Now to verify if the persmissions were applied sucessfully run this command
ls -lh /swapfile- Create a linux swap area on file we created
sudo mkswap /swapfile- Activate the swap file created earlier by running the following command
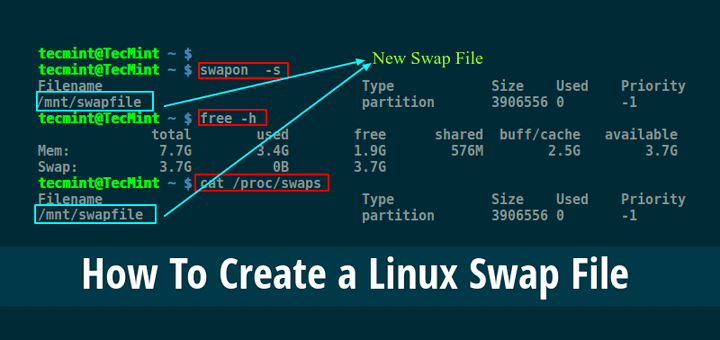
sudo swapon /swapfile- Verifying the file was activated sucessfully
sudo swapon --show- Now to make our changes permanet we have to write a system file for this simply run this command or manually write the file with this
echo '/swapfile none swap sw 0 0' | sudo tee -a /etc/fstab- We have to adjust spaniness of the system. In basic words in linux systems we can set snapiness value between 0 - 100 where as 0 means kernel will try its best not to try writing in swapiness and 100 means its gonna go wild on swap and use it more. For normal systems you can use 50-60 but for production servers we'd recommend to setting it to 10
sudo sysctl vm.swappiness=10- But to check current value you can use this command
cat /proc/sys/vm/swappiness- And then run these following commands to improve swap experience
cat /proc/sys/vm/vfs_cache_pressure
sudo sysctl vm.vfs_cache_pressure=50
echo "sudo nano /etc/sysctl.conf"
echo "vm.vfs_cache_pressure=50"
echo "vm.swappiness=10"
💡
Or you can all together just create a bash script and execute it on the go
#!/bin/bash
sudo fallocate -l 1G /swapfile
ls -lh /swapfile
sudo chmod 600 /swapfile
ls -lh /swapfile
sudo mkswap /swapfile
sudo swapon /swapfile
sudo swapon --show
echo '/swapfile none swap sw 0 0' | sudo tee -a /etc/fstab
sudo sysctl vm.swappiness=10
cat /proc/sys/vm/vfs_cache_pressure
sudo sysctl vm.vfs_cache_pressure=50
echo "sudo nano /etc/sysctl.conf"
echo "vm.vfs_cache_pressure=50"
echo "vm.swappiness=10"And paste the following code in it and then set the correct permissions
sudo chmod -R 755 swap.shand then simply run it like this and it'll create a 1GB of swap memory
./swap.sh